Your Cart (0)
Front Panel Setting
Retro Sound Radio Front Panel Selection Settings
The Retro Radio range of radios have many different options for the front panel with the LCD. Some use knobs on control shafts, others use thumb-wheels or toggles; some don't have push-buttons on the LCD. Models like Grand Prix, RetroRadio, Redondo and Apache to name some of them are all a bit different. This is one of the great features to enable all sorts of custom looks, making the radio appear as original as possible. However, due to their different controls, the radio body needs to be set to take advantage of the fitted front panel.
Sometimes the setting may have been accidentally changed in the radio settings too. So if the setting is not correct, the buttons, knobs and controls will not operate correctly. This isn't a fault, you just need to change the setting to the correct one to match the fitted front panel.
Instructions for Apache Type (No Push-buttons under LCD) or Redondo RT Thumb-wheel Radios
- Turn off the ignition and wait 30 seconds.
- Turn the ignition on.
- Once the radio displays 'RETROSOUND' on the screen, press and hold the radio's power button for approximately 15 seconds to reboot and enter SEL PANEL mode (short for Select Panel). The screen will display 'SEL PANEL' when successful.
- Release the power button.
- Press and release the power button repeatedly until your desired Panel/Display type is shown on the screen. The selected display type will flash five times and then the screen will turn off.
- Press the power button once more to turn the radio back on. The radio is now in the selected Panel/Display mode chosen and is ready to use. (See below for your face type Power on)
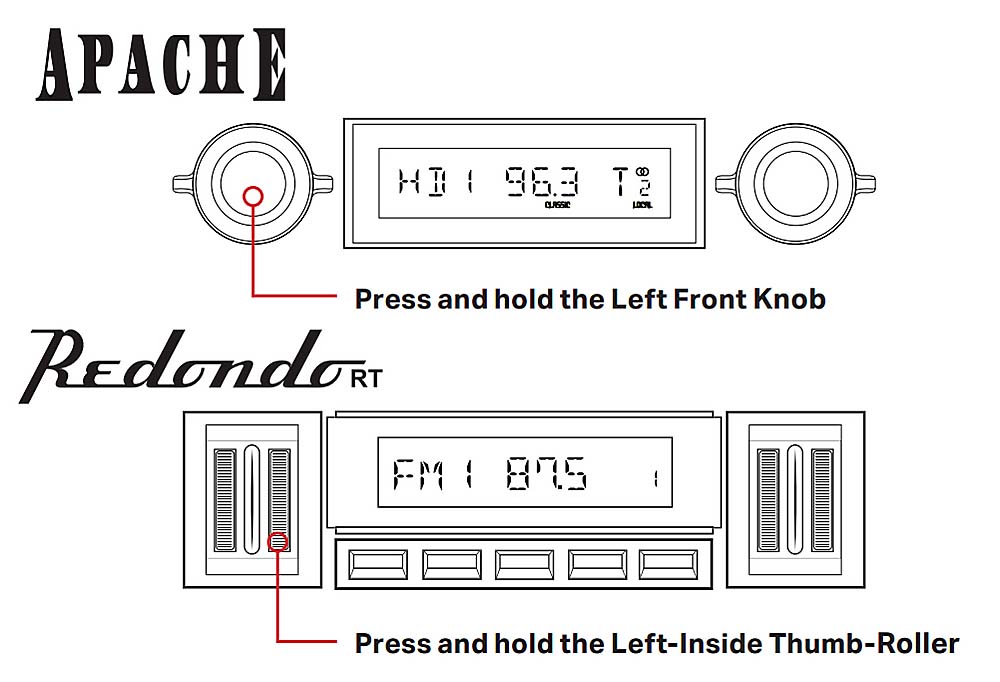
Apache and Redondo RT Style Select Panel
Instructions for Grand Prix Toggle Style Radio
- The following steps must be performed to set up the Radio Motor to function with the Grand Prix Radio Face controls.
- Turn off the ignition and wait 30 seconds.
- Turn the ignition on.
- With the vehicle's ignition on and the time displayed on the Radio Face, press and hold the Power Button for approximately 15 seconds to reboot the radio into 'SEL PANEL' mode (short for select panel).
- Once 'SEL PANEL' is displayed release the Power Button and tap the Volume Paddle up until 'GRAND PRIX' is displayed on the screen.
- The display will flash 'GRAND PRIX' five times and will turn off.
- Your radio motor is now configured to work with your selected radio face.
- Press the power button to turn the radio on and continue with the setup process.
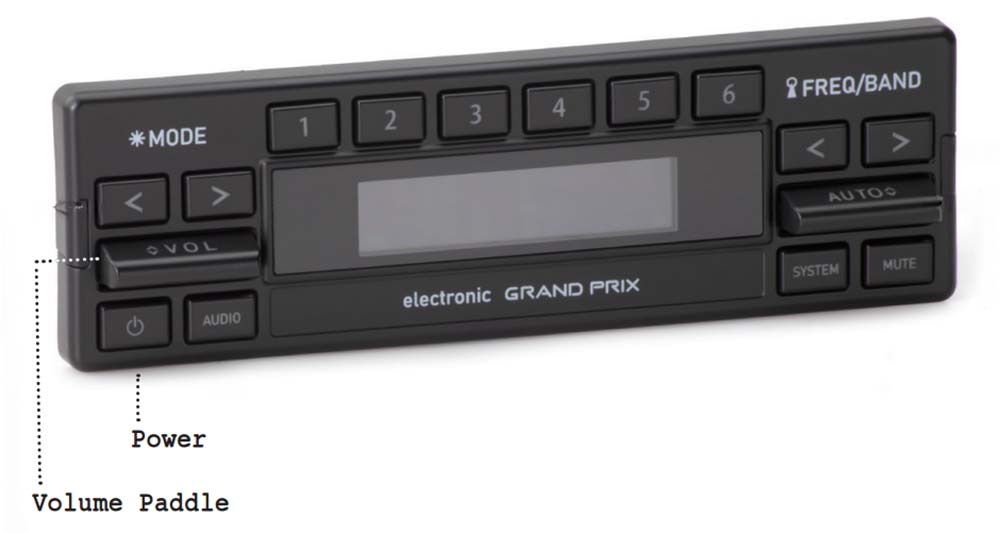
Grand Prix Style Select Panel
Instructions for Radios with Two Control Knob Shafts, such as RetroRadio, Dallas, Daytona, Denver, Europa, Detroit, Huntington, New York, Monterey, Santa Crux, and Wonderbar - This is used for when the setting has been changed from the default
- Turn the ignition on.
- Once the radio displays 'RETROSOUND' on the screen, press and hold the radio's power button for approximately 15 seconds to reboot and enter the SEL PANEL mode (short for Select Panel). The screen will display 'SEL PANEL' when successful.
- Release the power button.
- For radios with control knobs: Press and release the power button repeatedly until your desired Panel/Display type is shown on the screen. The selected display type will flash five times and then the screen will turn off.
- Press the power button once more to turn the radio back on. The radio is now in the selected Panel/Display mode chosen and is ready to use.